Roland V-Synth GT Manuel d'utilisateur
Naviguer en ligne ou télécharger Manuel d'utilisateur pour Les dispositifs de saisie Roland V-Synth GT. Roland V-Synth GT User Manual Manuel d'utilisatio
- Page / 248
- Table des matières
- MARQUE LIVRES
- 04566667 07-04-1N 1
- DECLARATION OF CONFORMITY 2
- IMPORTANT SAFETY INSTRUCTIONS 4
- SAVE THESE INSTRUCTIONS 4
- USING THE UNIT SAFELY 5
- IMPORTANT NOTES 7
- Using USB Memory 8
- Contents 10
- How to Use the Documentation 15
- Main Features 16
- Getting Ready 17
- Turning On the Power 18
- Turning Off the Power 19
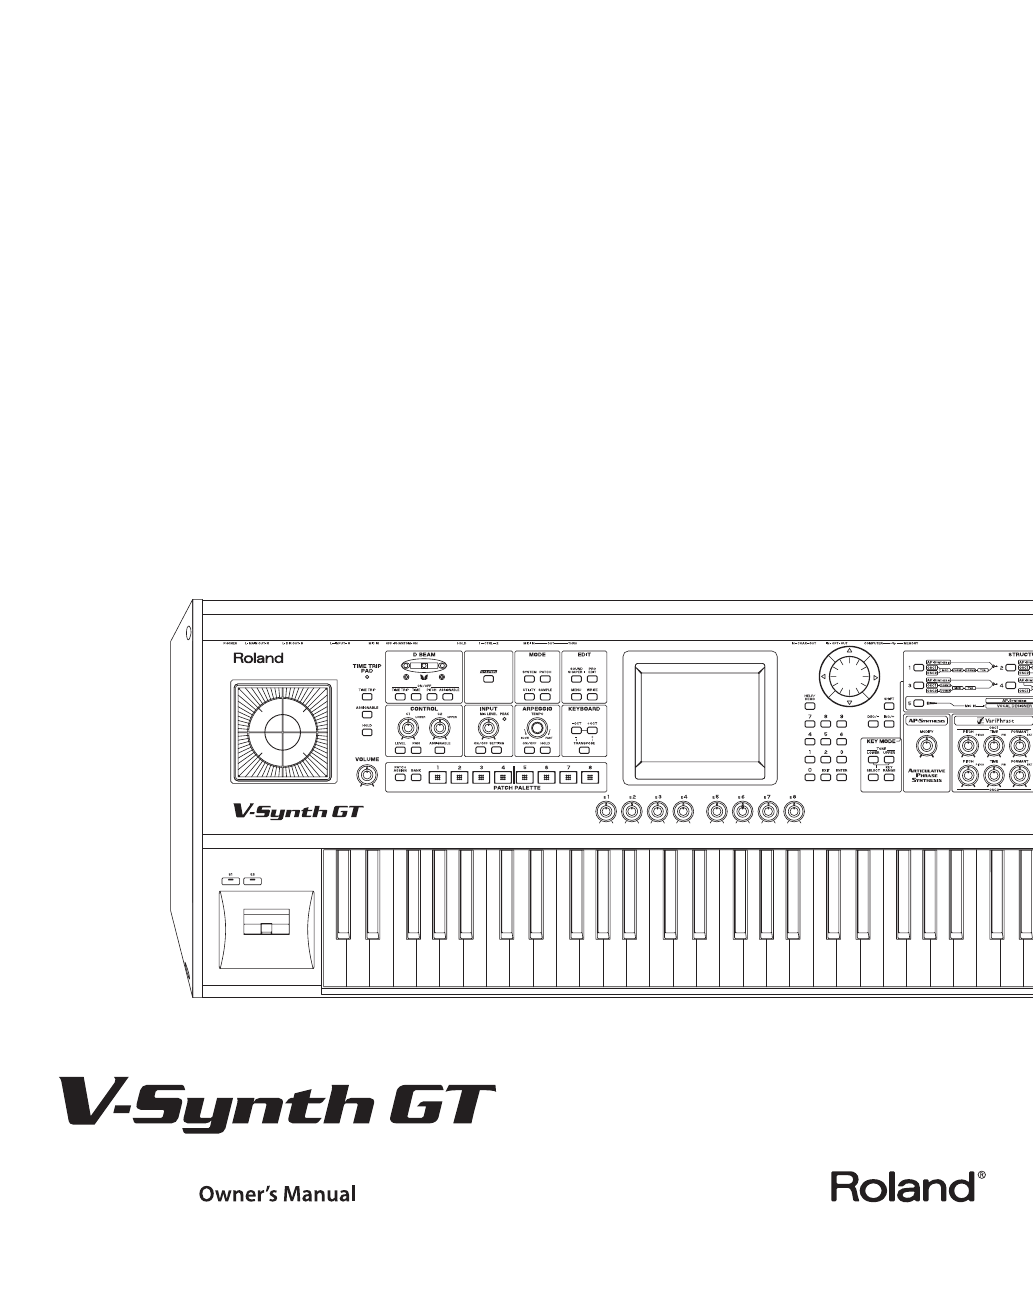
- Panel Descriptions 20
- Rear Panel 24
- Overview of the V-Synth GT 26
- About Structures 28
- About Memory 30
- About VariPhrase 32
- Moving the Cursor 33
- Editing a Value 34
- E1–E8 Knobs 35
- Envelope Sliders 35
- Using the Map Function 37
- The V-Synth GT’s Four Modes 38
- About the Patch Play Screen 39
- Selecting a Patch 40
- Pitch Bend/Modulation Lever 43
- Using the E1–E8 Knobs 49
- Arpeggiator 51
- Example Connections 52
- Enter V-LINK Mode 53
- Patch Mode (Editing a Patch) 54
- Selecting a Tone 55
- Category Search Area 57
- Keyword Search Area 57
- Patch Menu 58
- Patch Name (Naming a Patch) 59
- Patch Category List 61
- Key Range 68
- Arpeggio 69
- Erasing a Pattern (Clear) 75
- Patch Mode (Editing a Tone) 80
- Tone Menu 81
- Tone Name (Naming a Tone) 82
- Structure 86
- Bender/Octave 90
- Matrix Control 91
- OSC1/OSC2 (Oscillator 1/2) 95
- OSC Type (Analog OSC) 96
- What is a sub-oscillator? 98
- OSC Type (PCM OSC) 99
- Editing a Tone (Pro Edit) 100
- OSC Type (External In) 101
- Pulse Width (Analog) 103
- Fat (Analog) 104
- Time (PCM) 111
- Formant (PCM) 112
- MOD Type 115
- COSM1/COSM2 117
- Making Envelope Settings 121
- Making LFO Settings 122
- How to Apply the LFO 123
- AP Syn (AP-Synthesis) 124
- Phrase Model 125
- Control 1 137
- Control 2 138
- Tone-FX (Tone Effect) 139
- <Step Mod> 142
- Multi Step Modulator Switch 142
- Multi Step Modulator 144
- Vocal Designer 146
- Using Vocal Designer 148
- Mic Settings 151
- Noise Sup 153
- Stereo/Mono/Enhance 156
- AP-Synthesis 161
- Sample Mode 163
- Sampling Procedure 165
- Sample Name (Naming a Sample) 168
- Sample Move (Moving a Sample) 170
- Resampling 173
- Editing a Sample 178
- (Zero Cross Search) 181
- Sample Editing Functions 183
- Loop Region Settings 185
- Original Tempo Setting 186
- Selecting the Encoding Type 188
- Saving a Sample 191
- Checking Sample Information 192
- Editing Groups 193
- System Menu 194
- USB MIDI 199
- Audio Input 200
- Audio Output 201
- USB Audio 202
- Keyboard 203
- Time Trip Pad 204
- V-LINK Settings 208
- C1/C2 Knob 211
- Utility Mode 214
- Disconnecting USB Storage 222
- Internal Memory 226
- USB Memory 226
- Beep (Beep Tone Settings) 227
- Screen Saver 229
- MIDI Implementation Chart 236
- Specifications 237
Résumé du contenu
*04566667- 01* As of November 1, 2006 (ROLAND)Information When you need repair service, call your nearest Roland Service Center or authorized Rolan
10 Contents Patch Mode (Playing in Patch Mode) ...39 About the Patch Play
100 Editing a Tone (Pro Edit) Com MOD COSM1/2 TVA EffectsOSC1/2 AP Syn Coarse Tune (Oscillator Coarse Tune) -48– +48Adjusts the pitch of the oscillat
101 Editing a Tone (Pro Edit) Com MOD COSM1/2 TVA EffectsOSC1/2 AP Syn You can use the signal being received from the rear panel INPUT jack as the os
102 Editing a Tone (Pro Edit) Com MOD COSM1/2 TVA EffectsOSC1/2 AP Syn fig.06b-24-ps.eps_50 In this screen you can make settings for the envelope tha
103 Editing a Tone (Pro Edit) Com MOD COSM1/2 TVA EffectsOSC1/2 AP Syn fig.06b-25-ps.eps_50 In this screen you can make settings for the envelope tha
104 Editing a Tone (Pro Edit) Com MOD COSM1/2 TVA EffectsOSC1/2 AP Syn fig.06b-26-ps.eps_50 In this screen you can make settings for the envelope tha
105 Editing a Tone (Pro Edit) Com MOD COSM1/2 TVA EffectsOSC1/2 AP Syn fig.06b-28-ps.eps_50 In this screen you can make settings for the envelope tha
106 Editing a Tone (Pro Edit) Com MOD COSM1/2 TVA EffectsOSC1/2 AP Syn fig.06b-29-ps.eps_50 In this screen you can make settings for the envelope tha
107 Editing a Tone (Pro Edit) Com MOD COSM1/2 TVA EffectsOSC1/2 AP Syn fig.06b-29-ps.eps_50 In this screen you can make settings for the envelope tha
108 Editing a Tone (Pro Edit) Com MOD COSM1/2 TVA EffectsOSC1/2 AP Syn fig.06b-30-ps.eps_50 In this screen you can make settings for the envelope tha
109 Editing a Tone (Pro Edit) Com MOD COSM1/2 TVA EffectsOSC1/2 AP Syn fig.06b-31-ps.eps_50 In this screen you can make settings for the envelope tha
11 Contents Patch Mode (Editing a Tone) ...80 Creating a Tone
110 Editing a Tone (Pro Edit) Com MOD COSM1/2 TVA EffectsOSC1/2 AP Syn fig.06b-32-ps.eps_50 In this screen you can make settings for the envelope tha
111 Editing a Tone (Pro Edit) Com MOD COSM1/2 TVA EffectsOSC1/2 AP Syn fig.06b-33-ps.eps_50 Time Offset <How the Time parameter is related to play
112 Editing a Tone (Pro Edit) Com MOD COSM1/2 TVA EffectsOSC1/2 AP Syn fig.06b-34-ps.eps_50 You can use this only if the Vari switch (p. 99) is on an
113 Editing a Tone (Pro Edit) Com MOD COSM1/2 TVA EffectsOSC1/2 AP Syn fig.06b-35-ps.eps_50 In this screen you can make settings for the envelope tha
114 Editing a Tone (Pro Edit) Com MOD COSM1/2 TVA EffectsOSC1/2 AP Syn fig.06b-36-ps.eps_50 In this screen you can make settings for the LFO that aff
115 Editing a Tone (Pro Edit) Com MOD COSM1/2 TVAOSC1/2 AP Syn Effects In the MOD section, you can not only simply mix OSC1 and OSC2, but also combin
116 Editing a Tone (Pro Edit) Com MOD COSM1/2 TVAOSC1/2 AP Syn Effects ENV RINGThis is an envelope ring. It uses the volume changes (envelope) of OSC
117 Editing a Tone (Pro Edit) Com MOD COSM1/2 TVAOSC1/2 AP Syn Effects Here you can apply various effects to the sound. COSM effects are similar to t
118 Editing a Tone (Pro Edit) Com MOD COSM1/2 TVAOSC1/2 AP Syn Effects fig.06b-51.eps_50 For some COSM selections that you choose in COSM Type, you c
119 Editing a Tone (Pro Edit) Com MOD COSM1/2 TVAOSC1/2 AP Syn Effects This section determines the volume and panning.TVA stands for Time Variant Amp
12 Contents AP Syn (AP-Synthesis)...124Phrase Model ...
120 Editing a Tone (Pro Edit) Com MOD COSM1/2 TVAOSC1/2 AP Syn Effects fig.06b-56-j.eps_50 In this screen you can make settings for the LFO that affe
121 Editing a Tone (Pro Edit) Com MOD COSM1/2 TVAOSC1/2 AP Syn EffectsMaking Envelope Settings Parameter Value DescriptionVelocity Curve (Envelope Ve
122 Editing a Tone (Pro Edit) Com MOD COSM1/2 TVAOSC1/2 AP Syn EffectsMaking LFO Settings “LFO Curve” in the lower right of the screen shows a wave g
123 Editing a Tone (Pro Edit) Com MOD COSM1/2 TVAOSC1/2 AP Syn EffectsHow to Apply the LFO ● Apply the LFO gradually after the key is pressed fig.LFO
124 Editing a Tone (Pro Edit) Com MOD COSM1/2 TVAOSC1/2 AP Syn EffectsCom MOD COSM1/2 TVAOSC1/2 AP Syn Effects AP-Synthesis is the world’s first soun
125 Editing a Tone (Pro Edit) Com MOD COSM1/2 TVAOSC1/2 AP Syn EffectsCom MOD COSM1/2 TVAOSC1/2 AP Syn Effects fig.06b-61-ps.eps_50 Phrase Model Para
126 Editing a Tone (Pro Edit) Com MOD COSM1/2 TVAOSC1/2 AP Syn EffectsCom MOD COSM1/2 TVAOSC1/2 AP Syn Effects fig.06b-62-ps.eps_50 Pitch ParameterVa
127 Editing a Tone (Pro Edit) Com MOD COSM1/2 TVAOSC1/2 AP Syn EffectsCom MOD COSM1/2 TVAOSC1/2 AP Syn Effects fig.06b-63-ps.eps_50 Modify (when Phra
128 Editing a Tone (Pro Edit) Com MOD COSM1/2 TVAOSC1/2 AP Syn EffectsCom MOD COSM1/2 TVAOSC1/2 AP Syn Effects fig.06b-64-ps.eps_50 Modify (when Phra
129 Editing a Tone (Pro Edit) Com MOD COSM1/2 TVAOSC1/2 AP Syn EffectsCom MOD COSM1/2 TVAOSC1/2 AP Syn Effects fig.06b-65-ps.eps_50 Modify (when Phra
13 Contents Sampling General (Setup Settings) ...174Sampling Pre-Effect (Pre-Effect Settings)...
130 Editing a Tone (Pro Edit) Com MOD COSM1/2 TVAOSC1/2 AP Syn EffectsCom MOD COSM1/2 TVAOSC1/2 AP Syn Effects fig.06b-66-ps.eps_50 Modify (when Phra
131 Editing a Tone (Pro Edit) Com MOD COSM1/2 TVAOSC1/2 AP Syn EffectsCom MOD COSM1/2 TVAOSC1/2 AP Syn Effects fig.06b-67-ps.eps_50 Modify (when Phra
132 Editing a Tone (Pro Edit) Com MOD COSM1/2 TVAOSC1/2 AP Syn EffectsCom MOD COSM1/2 TVAOSC1/2 AP Syn Effects fig.06b-70-ps.eps_50 Advanced (when Ph
133 Editing a Tone (Pro Edit) Com MOD COSM1/2 TVAOSC1/2 AP Syn EffectsCom MOD COSM1/2 TVAOSC1/2 AP Syn Effects fig.06b71-ps.eps_50 Advanced (when Phr
134 Editing a Tone (Pro Edit) Com MOD COSM1/2 TVAOSC1/2 AP Syn EffectsCom MOD COSM1/2 TVAOSC1/2 AP Syn Effects fig.06b-73-ps.eps_50 Advanced (when Ph
135 Editing a Tone (Pro Edit) Com MOD COSM1/2 TVAOSC1/2 AP Syn EffectsCom MOD COSM1/2 TVAOSC1/2 AP Syn Effects fig.06b-74-ps.eps_50 Advanced (when Ph
136 Editing a Tone (Pro Edit) Com MOD COSM1/2 TVAOSC1/2 AP Syn EffectsCom MOD COSM1/2 TVAOSC1/2 AP Syn Effects fig.06b-75-ps.eps_50 Advanced (when Ph
137 Editing a Tone (Pro Edit) Com MOD COSM1/2 TVAOSC1/2 AP Syn EffectsCom MOD COSM1/2 TVAOSC1/2 AP Syn Effects fig.06b-76.eps_50 Control 1 ParameterD
138 Editing a Tone (Pro Edit) Com MOD COSM1/2 TVAOSC1/2 AP Syn EffectsCom MOD COSM1/2 TVAOSC1/2 AP Syn Effects fig.06b-77-ps.eps_50 Control 2 Paramet
139 Editing a Tone (Pro Edit) Com MOD COSM1/2 TVAOSC1/2 AP Syn Effects The V-Synth GT contains three high-quality effects: Tone-FX (tone effect), Cho
14 Contents Utility Mode...214 Project
140 Editing a Tone (Pro Edit) Com MOD COSM1/2 TVAOSC1/2 AP Syn Effects Tone-FX (Tone-FX On/Off Switch) OFF, ONSwitches Tone-FX on and off. Tone-FX Ty
141 Editing a Tone (Pro Edit) Com MOD COSM1/2 TVAOSC1/2 AP Syn Effects fig.06b-81.eps_50 This effect is applied to the entire patch.For details, refe
142 Editing a Tone (Pro Edit) The Multi Step Modulator is a function that modulates the value of various parameters according to a sixteen-step seque
143 Editing a Tone (Pro Edit) 5. Make settings for the track. Touch one of the tabs for a track name you turned on in step 4. fig.StepModTrackSW2 6.
144 Editing a Tone (Pro Edit) fig.06b-80.eps Multi Step Modulator ParameterValue DescriptionMulti Step Modulator Switch * This setting applies to all
145 Editing a Tone (Pro Edit) Track Button A–D (Step Modulator Track Buttons A–D) OFF, ONThese turn the multi step modulator on/off for the four trac
146 Vocal Designer If you select structure type 5, you’ll be able to use Vocal Designer.Vocal Designer is a function that uses cutting-edge human voc
147 Vocal Designer Vocal Designer consists of four elements: the mic, OSC1/2 (carrier), the vocoder, and effects. fig.06d-02-j.eps How Vocal Designer
148 Vocal Designer Connecting a Mic 1. Connect your mic to the “MIC IN jack.” 2. Press INPUT [SETTING] on the panel. The Audio Input Settings screen
149 Vocal Designer Make settings for Vocal Designer 1. Select structure type 5. • Select Structure Type 5 in the Pro Edit screen (p. 86).• Press STRU
15 How to Use the Documentation The V-Synth GT documentation is organized as follows. Refer to the printed documentation or CD-ROM as appropriate for
150 Vocal Designer fig.06d-10-ps.eps Vocal Designer ParameterValue DescriptionVocal Designer Switch OFF, ONTurns Vocal Designer on/off. MicLevel 0–12
151 Vocal Designer fig.06d-04-j.eps Mic effects such as equalizer are provided to enhance the mic input.You can use these to adjust the character of
152 Vocal Designer Equalizer: Adjusts the character of the low, mid, and high-frequency ranges.The EQ settings are shown by the graph in the middle
153 Vocal Designer Noise suppressor: Suppresses noise when no sound is being input. fig.06d-13-ps.eps Noise Sup ParameterValue DescriptionMic/Noise
154 Vocal Designer Compressor: Reduces high-level sounds and boosts low-level sounds, thus improving the overall volume balance of the sound. fig.06
155 Vocal Designer fig.06d-05-j.eps You can use these settings to modify the character of the vocal sound created by Vocal Designer.Choose one of the
156 Vocal Designer Stereo/Mono/Enhance fig.06d-xxx-ps.eps ParameterValue DescriptionFormant Type FlatNo conversion.Soprano Transforms the mic input s
157 Vocal Designer Vintage fig.06d-21-ps.eps The chorus of the Vintage vocoder is applied separately from the patch effect named Chorus. Parameter Va
158 Editing a Tone (SOUND SHAPER II) By using the “Sound Shaper II” function you can edit the tone simply by turning knobs or pressing buttons. 1. Ac
159 Editing a Tone (SOUND SHAPER II) In the case of Structure 5 fig.soundshape03 3. Touch <COSM> to make COSM settings (p. 160). 4. Touch <A
16 Main Features The V-Synth GT is a professional synthesizer that brings together Roland’s revolutionary technologies. A variety of sound generators
160 Editing a Tone (SOUND SHAPER II) Here you can use the [E1]–[E8] knobs to edit the most important COSM parameters. fig.06c-xx-ps.eps_50 1. Use the
161 Editing a Tone (SOUND SHAPER II) Here you can use the [E1]–[E8] knobs to edit the most important AP-Synthesis parameters. fig.06c-10-ps.eps_50 1.
162 Editing a Tone (SOUND SHAPER II) Here you can use the [E1]–[E8] knobs to edit the most important parameters of each effect. fig.06c-20-ps.eps_50
163 Sample Mode In this chapter, we will explain the procedures for:• Sampling (p. 163)• Editing samples (p. 178)• Converting samples so the VariPhra
164 Sample Mode Factory Settings of Each Template Setup Mic Line Coaxial Resampl Sampling Type MONO STEREO STEREO STEREOInput Source ANALOG ANALOG CO
165 Sample Mode Sampling Procedure Here’s how to input a sound from the input jacks and sample it. For resampling, refer to the following section.The
166 Sample Mode 2. Select the location (sample number) that you wish to sample. Move the cursor to the desired sample. Normally, you will select a sa
167 Sample Mode 7. Adjust the sampling level. Adjust the volume of the device that is producing the sound.When sampling from the MIC IN jack, adjust
168 Sample Mode Assign a new name to the sample. You can assign a name consisting of up to twelve characters. 1. Access the Sample Top screen, and se
169 Sample Mode 1. Access the Sample Top screen (p. 165). 2. Touch <MENU> in the upper right of the screen. A pulldown menu appears. fig.07-03_
17 Getting Ready Since the V-Synth GT contains no amplifier or speakers, you’ll need to connect it to audio equipment such as a keyboard amplifier, m
170 Sample Mode 1. Access the Sample Top screen (p. 165). 2. Touch <MENU> in the upper right of the screen. A pulldown menu appears. fig.07-03_
171 Sample Mode 1. Access the Sample Top screen (p. 165). 2. Touch <MENU> in the upper right of the screen. A pulldown menu appears. fig.07-03_
172 Sample Mode 1. Access the Sample Top screen (p. 165). 2. Touch <MENU> in the upper right of the screen. A pulldown menu appears. fig.07-03_
173 Sample Mode The V-Synth GT is able to resample samples from its internal memory. This is called resampling. In actuality, the sounds that are out
174 Sample Mode fig.04-06_50 Sampling General (Setup Settings) ParameterValue DescriptionSampling Type STEREO L RSamples in stereo.MONO MIX Mixes the
175 Sample Mode fig.04-07_50 There are three pre-effects: compressor, limiter, and noise suppressor. By using these you can adjust the level of the s
176 Sample Mode fig.04-08_50 Metronome (Metronome Settings) ParameterValue DescriptionMetro Type (Metronome Type) OFFThe metronome will not sound.REC
177 Sample Mode A template can be given a name of up to eight characters. 1. Access the Sampling Template screen, and select the sample that you want
178 Sample Mode When you have finished sampling, you can edit the sample data. When editing a sample, touching <PREVIEW> will play the sample s
179 Sample Mode 4. Touch one of the tabs in the left side of the screen to access the desired editing screen. <Edit>: Edit the sample of the sp
18 Getting Ready 941 Once you’ve made connections correctly (see preceding page), turn on the power using the following procedure. Powering up your e
180 Sample Mode (LENGTH LOCK) This locks the length of the region between the start point (Start) and end point (End) of the sample. It is convenien
181 Sample Mode (Zero Cross Search) This function searches for locations where the sample has a value of zero. When setting loop points or when cutt
182 Sample Mode You can specify a region of the sample, and edit the region by cutting or copying. Basic Operation 1. Access the Sample Edit screen (
183 Sample Mode Sample Editing Functions fig.04-18 Cut The region of the sample between Edit Start and Edit End will be cut. Truncate The region of t
184 Sample Mode Normalize The Normalize operation is used to uniformly increase or decrease the level of the entire sample without allowing it to dis
185 Sample Mode When the loop switch (p. 180) is ON, you can specify the region that will be played back as a loop. The region of the sample between
186 Sample Mode The Original Tempo is the reference tempo of the sample used when synchronizing it to the master tempo.Example: A sample whose origin
187 Sample Mode After you have finished editing the sample, you should encode it. By using the encoding that is appropriate for the sample, you’ll be
188 Sample Mode You can choose from the following four types of encoding. Touch the appropriate button to select a type. fig.04-21 • If the data is e
189 Sample Mode By specifying the Depth, you can automatically detect and “ ▼ ”mark locations where there is a strong attack (i.e., locations where t
19 Getting Ready 5. Adjust the volume appropriately. While playing the keyboard to produce sound, adjust the volume of the V-Synth GT and of the conn
190 Sample Mode Setting the Encode Depth and automatically detecting events does not guarantee that the events will be added at the locations that yo
191 Sample Mode Samples that you sample or encode will be lost when you turn off the power. If you want to keep these samples, use the Save Project s
192 Sample Mode 1. Access the Sample Top screen (p. 165). 2. Touch <Info>. The Sample Information screen appears. fig.04-10a_50 In the Sample I
193 System Mode (Settings Common to All Modes) Settings that affect the entire operating environment of the V-Synth GT, such as tuning and MIDI messa
194 System Mode (Settings Common to All Modes) Changes you make to the System function settings are only temporary—they will be discarded as soon as
195 System Mode (Settings Common to All Modes) The current settings of the system functions can be restored to the factory settings. 1. Touch <MEN
196 System Mode (Settings Common to All Modes) fig.08-02.eps_50 Common (Settings Common to the Entire System) Master ParameterValue DescriptionMaster
197 System Mode (Settings Common to All Modes) fig.08-04.eps_50 EQ ParameterValue DescriptionSystem EQ Switch OFF, ONSwitches the System EQ on/off. T
198 System Mode (Settings Common to All Modes) fig.08-05.eps_50 MIDI ParameterValue DescriptionDevice ID (Device ID Number) 17–32When you want to tra
199 System Mode (Settings Common to All Modes) fig.08-08.eps_50 USB MIDI ParameterValue DescriptionUSB-MIDI Thru Switch OFF, ONSpecifies whether MIDI
This product complies with the requirements of European Directives EMC 89/336/EEC and LVD 73/23/EEC.For EU CountriesFor CanadaThis Class B digital a
20 Panel Descriptions 00b-01.eps TIME TRIP PAD By touching the pad surface with your finger you can apply a variety of effects to the sound. (p. 46)
200 System Mode (Settings Common to All Modes) fig.08-03.eps_50 Audio Input ParameterValue DescriptionMic Sw (MIC Jack Switch) ON, OFFSpecifies wheth
201 System Mode (Settings Common to All Modes) fig.08-06.eps_50 Audio Output ParameterValue DescriptionOutput Gain -12– +12 dBThis adjusts the output
202 System Mode (Settings Common to All Modes) fig.08-07.eps_50 USB Audio ParameterValue DescriptionMic Sw (MIC Jack Switch) ON, OFFSpecifies whether
203 System Mode (Settings Common to All Modes) fig.08-11.eps_50 Controller (Controller-related Settings) Keyboard ParameterValue DescriptionKeyboard
204 System Mode (Settings Common to All Modes) fig.08-12.eps_50 Time Trip Pad ParameterValue DescriptionX Assign-XY OFFNo message will be transmitted
205 System Mode (Settings Common to All Modes) fig.08-14.eps_50 D-Beam ParameterValue DescriptionBeam Sens L, R (D Beam Sensitivity L, R) 0–200This s
206 System Mode (Settings Common to All Modes) fig.08-17.eps_50fig.08-19.eps_50 C1/C2 Knob ParameterValue DescriptionC1, 2 Knob Assign OFFNo message
207 System Mode (Settings Common to All Modes) fig.08-18.eps_50 Pedal ParameterValue DescriptionHold Polarity (Hold Pedal Polarity) Standard, Reverse
208 System Mode (Settings Common to All Modes) fig.08-20.eps_50 V-LINK Settings Tx ParameterValue DescriptionV-LINK MIDI Channel 1–16Specifies the ch
209 System Mode (Settings Common to All Modes) fig.08-21.eps_50 Time Trip Pad ParameterValue DescriptionTime Trip Pad Local Sw (V-LINK Time Trip Pad
21 Panel Descriptions MODE These buttons switch between modes of the V-Synth GT. EDIT Use these buttons when you want to edit a patch or tone. VOLUME
210 System Mode (Settings Common to All Modes) fig.08-23.eps_50 D Beam ParameterValue DescriptionD Beam Local Sw (V-LINK D Beam Local Switch) OFF, ON
211 System Mode (Settings Common to All Modes) fig.08-24.eps_50 C1/C2 Knob ParameterValue DescriptionC1, 2 Knob Local Sw (V-LINK Knob1, 2 Local Switc
212 System Mode (Settings Common to All Modes) fig.08-26.eps_50 Bender ParameterValue DescriptionModulation Local Sw (V-LINK Modulation Local Switch)
213 System Mode (Settings Common to All Modes) Here you can check the V-Synth GT’s program version. fig.08-30.eps_50 Here you can view a screen that
214 Utility Mode Utility mode provides various functions for your convenience when using the V-Synth GT.Press [UTILITY] to access the Utility Menu sc
215 Utility Mode You can load a project from USB memory into the V-Synth GT’s temporary area, or save the project that’s in the temporary area.This o
216 Utility Mode 5. Touch <OK>. A Warning window like the following appears. fig.09-03-ps.eps_50 If you want to cancel the procedure at this po
217 Utility Mode This operation saves the project from the temporary area into internal memory or USB memory. 1. Press [UTILITY] to access the Utilit
218 Utility Mode 5. Touch <OK>. A Warning window like the following appears. fig.09-05-ps.eps_50 If you want to cancel the procedure at this po
219 Utility Mode This operation will convert (import) a V-Synth Version 2.0 or V-Synth XT project for use with your V-Synth GT. 1. Using your compute
22 Panel Descriptions 00b-02.eps Pitch Bend/Modulation Lever This allows you to control pitch bend or apply vibrato. (p. 43) [S1] [S2] These will app
220 Utility Mode 7. Touch <OK>. A Warning window like the following appears. fig.09-xxx-ps.eps_50 If you want to cancel the procedure at this p
221 Utility Mode By connecting the V-Synth GT to your computer via a USB cable, you can save (back up) projects and other files such as individual pa
222 Utility Mode 5. Touch <USB Storage> in the Utility Menu screen. The USB Storage screen appears. fig.09-11-ps.eps_50 6. Touch <Mount the
223 Utility Mode Connecting the V-Synth GT to Your Computer 1. Make sure that the power of the V-Synth GT is turned off. 2. Start up your computer. 3
224 Utility Mode Disconnecting USB Storage 1. Select the V-Synth GT drive icon on the desktop, and drag it into the “trash.”Alternatively, select “Ej
225 Utility Mode Backing Up Patch and Wave Data (Project) from the V-Synth GT When using USB in Storage function, the data within the V-Synth GT may
226 Utility Mode The V-Synth GT’s File Structure As seen from your computer, the V-Synth GT’s file structure is as follows.Do not perform operations
227 Utility Mode You can specify whether a “beep” will be heard when you touch a valid point in the touch panel. * With the factory settings, there w
228 Utility Mode 1. Press [UTILITY] to access the Utility Menu screen. 2. Touch <E1–E8 knobs>. The E1–E8 Knob Settings screen appears. 3. Speci
229 Utility Mode This feature allows you to have a simple animation be displayed whenever the V-Synth GT has not been operated for a certain period o
23 Panel Descriptions KEY MODESTRUCTURE Here you can turn each sound-producing element (section) on or off. FX (EFFECTS) Here you can switch the onbo
230 Utility Mode You can change the background image of the touch panel.Via USB memory, you can also use data such as a photo you’ve taken as the bac
231 Utility Mode Perform this adjustment if the touch panel no longer responds as you expect. 1. In the Utility Menu screen, touch <Calibration>
232 Utility Mode Perform this adjustment if the Time Trip pad no longer responds as you expect. 1. In the Utility Menu screen, touch <Calibration&
233 Utility Mode Perform this adjustment if the D Beam controller is functioning incorrectly, such as responding even though you have not operated it
234 Utility Mode You can initialize (format) internal memory or USB memory to erase all data. 1. Press [UTILITY] to access the Utility Menu screen. 2
235 Utility Mode This restores all data in the V-Synth GT to the factory-set condition (Factory Reset). If there is important data you’ve created tha
236 MIDI Implementation Chart Function...BasicChannelModeNoteNumber :VelocityAfterTouchPitch BendControlChangeProgramChangeSystem ExclusiveSystemCom
237 Specifications V-Synth GT: Synthesizer Keyboard ● Keyboard 61 keys (with velocity and channel aftertouch) ● Sound Generator Configuration Dual-co
238 Specifications ● Connectors Headphone Jack (Stereo 1/4 inch phone type)Main Output Jacks (L/MONO, R) (1/4 inch TRS phone type)Direct Output Jacks
239 Index Symbols [-/+OCT] ... 21, 44–45 Numerics 1–4 Assign L, R ...
24 Panel Descriptions 00b-03.eps POWER Switch This switch turns the power on/off. AC Inlet Connect the included power cord to this inlet. USB Connect
240 Index Carrier ... 147, 150CategoryPatch ...
241 Index H Harmonics ... 108Harmonics Keyfollow ...
242 Index MIDI Clock ... 198MIDI Connectors ...
243 Index Portamento ... 87AP-Synthesis ...
244 Index [SYSTEM] ... 193System Init ...
245 Index VOCAL DESIGNER ... 29Vocal Designer ...
For EU CountriesGRSILVLTSKCZEEPLHUFISENODKNLPTESITDEFRUKV-Synth-GT_e.book 246 ページ 2007年4月9日 月曜日 午後1時46分
This product complies with the requirements of European Directives EMC 89/336/EEC and LVD 73/23/EEC.For EU CountriesFor CanadaThis Class B digital a
*04566667- 01* As of November 1, 2006 (ROLAND)Information When you need repair service, call your nearest Roland Service Center or authorized Rolan
25 Panel Descriptions MIC IN Jack This is a mic jack for analog audio signal input.It accommodates either XLR type or phone type plugs.XLR type conne
26 Overview of the V-Synth GT Broadly speaking, the V-Synth GT consists of a controller section and a sound generator section. fig.02-01-j Sound Gene
27 Overview of the V-Synth GT Controller Section The controller section consists of the keyboard, pitch bend/modulation lever, time trip pad, D Beam
28 Overview of the V-Synth GT The V-Synth GT’s upper tone and lower tone consist of eight elements ( sections ) that create the sound.The way in whic
29 Overview of the V-Synth GT There are eight sections, as follows. After you’ve selected a structure type, you can turn the various section buttons
3 Thank you, and congratulations on your choice of the Roland V-Synth GT. 985 The explanations in this manual include illustrations that depict what s
30 Overview of the V-Synth GT fig.02-04-e.eps About Memory Memory StructureV-Synth GTFactoryDataLoadSaveTemporary AreaLoadSaveInternal MemoryFactory
31 Overview of the V-Synth GT Project The largest unit of memory used by the V-Synth GT is the project. A project contains up to 512 patches, up to 8
32 Overview of the V-Synth GT What is VariPhrase? VariPhrase has the following advantages: 1. Capable of changing the pitch, rate of time expansion/c
33 Basic Operation of the V-Synth GT The V-Synth GT features a touch screen. The touch screen lets you perform a variety of operations by lightly tou
34 Basic Operation of the V-Synth GT To edit a value, you can use the VALUE dial, [INC/+] [DEC/-], or drag on the touch screen.• In each V-Synth GT s
35 Basic Operation of the V-Synth GT E1–E8 Knobs If the small numbers 1–8 are shown in the display, you can use the E1–E8 knobs to control the corres
36 Basic Operation of the V-Synth GT The V-Synth GT’s touch panel contains certain icons that perform common operations regardless of the scene.In ma
37 Basic Operation of the V-Synth GT Since the V-Synth GT lets you edit many different aspects of the sound, you may lose track of what you’re curren
38 Basic Operation of the V-Synth GT The V-Synth GT provides a large number of functions, which are organized into four operating modes: Patch mode,
39 Patch Mode (Playing in Patch Mode) When you press [PATCH], you’ll be in Patch mode, and the Patch Play screen will appear. fig.04-01-j.eps A patch
4 IMPORTANT SAFETY INSTRUCTIONS CAUTIONRISK OF ELECTRIC SHOCKDO NOT OPENATTENTION: RISQUE DE CHOC ELECTRIQUE NE PAS OUVRIRCAUTION: TO REDUCE THE R
40 Patch Mode (Playing in Patch Mode) 1. Press [PATCH] to access the Patch Play screen. fig.04-03-j.eps 2. Move the cursor to the patch number, eithe
41 Patch Mode (Playing in Patch Mode) You can display a list of patches and select a patch from that list. 1. In the upper left of the screen, touch
42 Patch Mode (Playing in Patch Mode) Favorite patches you use frequently can be registered in the Patch Palette. This allows you to quickly select f
43 Patch Mode (Playing in Patch Mode) The force with which you play the keyboard, or the “velocity” with which you play, can affect the volume or tim
44 Patch Mode (Playing in Patch Mode) Transpose changes keyboard pitch in units of semitones.This function is useful when you play transposed instrum
45 Patch Mode (Playing in Patch Mode) The Octave Shift function transposes the pitch of the keyboard in 1 octave units (-3– +3 octaves).For playing a
46 Patch Mode (Playing in Patch Mode) You can apply a variety of effects by touching your fingertip to the Time Trip pad located at the left side of
47 Patch Mode (Playing in Patch Mode) 3. While you play the keyboard to produce sound, place your fingertip on the Time Trip pad and move your finger
48 Patch Mode (Playing in Patch Mode) The D Beam controller can be used simply by waving your hand over it. It can be used to apply various effects,
49 Patch Mode (Playing in Patch Mode) You can modify the sound in real time by turning the E1–E8 knobs to control the functions assigned to the knobs
5 USING THE UNIT SAFELY 001 • Before using this unit, make sure to read the instructions below, and the Owner’s Manual. ...
50 Patch Mode (Playing in Patch Mode) You can turn the ASSIGNABLE CONTROL knobs to modify the sound in real time.The assignable controllers use matri
51 Patch Mode (Playing in Patch Mode) The V-Synth GT comes with an arpeggiator that can play arpeggios automatically. Once you turn on the arpeggiato
52 Patch Mode (Playing in Patch Mode) The V-Synth GT lets you use the pitch bend/modulation lever, Time Trip pad, D Beam controller, and C1/C2 knobs
53 Patch Mode (Playing in Patch Mode) 1. Press [V-LINK] so the indicator lights. V-Synth GT will enter V-LINK mode. For details on how to assign V-LI
54 Patch Mode (Editing a Patch) With the V-Synth GT, you have total control over a wide variety of settings.This chapter explains the procedures used
55 Patch Mode (Editing a Patch) Specifying the Upper Tone and Lower Tone A patch consists of an upper tone and a lower tone. When selecting a tone, y
56 Patch Mode (Editing a Patch) Selecting a Tone Once you’ve specified either the upper or lower tone, you can select the tone. fig.05-02-j.eps 1. Mo
57 Patch Mode (Editing a Patch) You can view a list of tones and select a tone from the list. 1. Touch the search button. The Upper (or Lower) Tone L
58 Patch Mode (Editing a Patch) Changes you make to sound settings are temporary, and will be lost if you turn off the power or select another sound.
59 Patch Mode (Editing a Patch) Assign a new name to the patch before you save it. You can assign a name of up to twelve characters to the patch. 1.
6 012a • Immediately turn the power off, remove the power cord from the outlet, and request servicing by your retailer, the nearest Roland Service Ce
60 Patch Mode (Editing a Patch) If you assign a category to your patches, you’ll be able to search for them by category in the Patch List window. If
61 Patch Mode (Editing a Patch) 4. Select a category from the list.Patch Category List 5. Touch <OK> to finalize the category. * You will lose
62 Patch Mode (Editing a Patch) “Initialize” means to return the settings of the currently selected patch to a standard set of values. The Initialize
63 Patch Mode (Editing a Patch) Here we’ll explain the parameters that are used in common by the entire patch ( Patch Common parameters ). 1. Press [
64 Patch Mode (Editing a Patch) 6. In each screen, touch the touch panel to edit the parameters. Move the cursor to the value box of the parameter yo
65 Patch Mode (Editing a Patch) fig.05-20-j.eps_50 Common (Settings Used by the Entire System) General ParameterValue DescriptionPatch Level 0–127Spe
66 Patch Mode (Editing a Patch) fig.05-21.eps_50 For details on settings for the Time Trip effect, refer to “Matrix Control” (p. 91) and “Time Tri
67 Patch Mode (Editing a Patch) fig.05-22.eps_50fig.05-24.eps_50 D Beam ParameterValue DescriptionD Beam (D Beam Mode) OFFThe D Beam controller will
68 Patch Mode (Editing a Patch) Here you can specify the zones of the keyboard in which the upper and lower tones are to be sounded.You can also spec
69 Patch Mode (Editing a Patch) In addition to accessing this screen from the Patch Common screen, you can access it directly by touching <Arpeggi
7 IMPORTANT NOTES 291b In addition to the items listed under “IMPORTANT SAFETY INSTRUCTIONS” and “USING THE UNIT SAFELY” on pages 4–6, please read an
70 Patch Mode (Editing a Patch) Shuffle Rate (Arpeggio Shuffle Rate) 0–100%This setting lets you modify the note timing to create shuffle rhythms.Wit
71 Patch Mode (Editing a Patch) You can create your own arpeggio pattern that specifies how an arpeggio will be sounded. This gives you even more int
72 Patch Mode (Editing a Patch) Pattern Input Area This area is where you input or edit notes or control changes. The symbols have the follow-ing mea
73 Patch Mode (Editing a Patch) Creating a Pattern by Playing in Real Time (Real Rec) This method lets you create a pattern in a way similar to realt
74 Patch Mode (Editing a Patch) Creating a Pattern by Inputting One Step at a Time (Step Rec) This method lets you create a pattern in a way similar
75 Patch Mode (Editing a Patch) Erasing a Pattern (Clear) Here’s how to erase data from the pattern. You can erase a specific line or the entire patt
76 Patch Mode (Editing a Patch) The V-Synth GT provides three high-quality effects: Tone-FX (tone effect), Chorus, and Reverb. The tone effect can be
77 Patch Mode (Editing a Patch) ParameterValue DescriptionTVA Tone-FX Send (TVA Tone-FX Send Level) 0–127These parameters can be set for each tone.Fo
78 Patch Mode (Editing a Patch) This is an effect that can be applied to each tone individually.For details, refer to “Tone-FX (Tone Effect)” (p. 1
79 Patch Mode (Editing a Patch) fig.05-52-j.eps Reverb ParameterValue DescriptionReverb Switch OFF, ONSwitches the Reverb on/off. REV Type (Reverb Ty
8 IMPORTANT NOTES 562 • Some connection cables contain resistors. Do not use cables that incorporate resistors for connecting to this unit. The use o
80 Patch Mode (Editing a Tone) A patch consists of a combination of two tones. This chapter will explain how to edit these tones, and what the tone p
81 Patch Mode (Editing a Tone) Changes you make to sound settings are temporary, and will be lost if you turn off the power or select another sound.
82 Patch Mode (Editing a Tone) Before you save the tone, here’s how to give it a new name. You can assign a name of up to twelve characters to a tone
83 Patch Mode (Editing a Tone) If you assign a category to your tones, you’ll be able to search for them by category in the Tone List window. If no c
84 Patch Mode (Editing a Tone) “Initialize” means to return the settings of the currently selected tone to a standard set of values. The Initialize o
85 Editing a Tone (Pro Edit) “Pro Edit” lets you individually edit all of a tone’s parameters, allowing you to perform detailed and professional tone
Com MOD COSM1/2 TVAOSC1/2 AP Syn Effects86 Editing a Tone (Pro Edit) Select the type of structure. The icons that indicate each section show the para
87 Editing a Tone (Pro Edit) Com MOD COSM1/2 TVAOSC1/2 AP Syn Effects fig.06b-11.eps_50 Mono/Poly, Legato, and Portamento have no effect on AP-Synthe
Com MOD COSM1/2 TVAOSC1/2 AP Syn Effects88 Editing a Tone (Pro Edit) Zone Settings (Zone) On the V-Synth GT, the keyboard range is divided into up to
89 Editing a Tone (Pro Edit) Com MOD COSM1/2 TVAOSC1/2 AP Syn Effects 4. Specify the split point between zones 01 and 02. Either turn the VALUE dial
9 Contents IMPORTANT SAFETY INSTRUCTIONS...4USING THE UNIT SAFELY...
Com MOD COSM1/2 TVAOSC1/2 AP Syn Effects90 Editing a Tone (Pro Edit) fig.06b-12.eps_50 Bender/Octave ParameterValue DescriptionBenderPitch Bend Range
91 Editing a Tone (Pro Edit) Com MOD COSM1/2 TVAOSC1/2 AP Syn Effects fig.06b-13-e.eps Matrix ControlMatrix ControlSourceMatrix ControlSensMatrix Con
Com MOD COSM1/2 TVAOSC1/2 AP Syn Effects92 Editing a Tone (Pro Edit) ParameterValue DescriptionSource 1, 2(Matrix Control Source 1, 2) Sets the MIDI
93 Editing a Tone (Pro Edit) Com MOD COSM1/2 TVAOSC1/2 AP Syn Effects When you touch <Search>, the Matrix Control Dest List window will appear,
Com MOD COSM1/2 TVAOSC1/2 AP Syn Effects94 Editing a Tone (Pro Edit) fig.06b-14.eps • Equal Temperament This tuning divides the octave into 12 equal
95 Editing a Tone (Pro Edit) Com MOD COSM1/2 TVA EffectsOSC1/2 AP Syn The “ oscillator ” is the section that specifies the basic wave that the V-Synt
96 Editing a Tone (Pro Edit) Com MOD COSM1/2 TVA EffectsOSC1/2 AP Syn fig.06b-21-ps.eps_50 OSC Type (Analog OSC) ParameterValue DescriptionWaveform (
97 Editing a Tone (Pro Edit) Com MOD COSM1/2 TVA EffectsOSC1/2 AP Syn Depending on the waveform you’re using, the assignment of knobs 5 and 6 will ch
98 Editing a Tone (Pro Edit) Com MOD COSM1/2 TVA EffectsOSC1/2 AP SynWhat is a sub-oscillator?The sub-oscillator adds a low pitch to create a thicker
99 Editing a Tone (Pro Edit) Com MOD COSM1/2 TVA EffectsOSC1/2 AP Syn fig.06b-22-ps.eps_50 OSC Type (PCM OSC) ParameterValue DescriptionWaveform (PCM
Produits connexes et manuels pour Les dispositifs de saisie Roland V-Synth GT
 (96 pages)
 (186 pages)
© 2020, manymanuals.fr. Tous droits réservés | 1.544 s |
 Manymanuals.com
 Manymanuals.de
 Manymanuals.fr
 Manymanuals.it
 Manymanuals.pl
 Manymanuals.cz
 Manymanuals.es
 Manymanuals-pt.com
Commentaires sur ces manuels