Roland CD-2u Manuel du propriétaire
Naviguer en ligne ou télécharger Manuel du propriétaire pour Matériel d'enregistrement Roland CD-2u. Roland CD-2u Owner`s manual [en] Manuel d'utilisatio
- Page / 140
- Table des matières
- DEPANNAGE
- MARQUE LIVRES
- Owner’s Manual 1
- Check the Included Items 3
- Table of Contents 4
- Deleting 5
- Creating a CD 5
- Advanced Uses 5
- Appendices 5
- List of Common Tasks 6
- USING THE UNIT SAFELY 8
- IMPORTANT NOTES 12
- Additional Precautions 13
- About the Licenses Agreement 13
- Panel Descriptions 14
- Remote Control 19
- 8x speed supported 20
- 4x/8x speeds supported 20
- Turning the Power On and Off 22
- About the Auto Off function 23
- Using Batteries 24
- Preparing an SD Memory Card 26
- Removing an SD Memory Card 28
- Preparing a CD 29
- Removing a CD 30
- Preparing the Remote Control 31
- Using the Remote Control 32
- Menu Operations 33
- List of Settings 34
- About Easy Guide 37
- Setting Items in Easy Guide 38
- 6. Overdub , 5. Overdub 40
- 7. Rehearsal , 6. Rehearsal 40
- (left channel) 41
- (right channel) 41
- If the input level is high 42
- If the input level is too low 42
- Blinking 43
- Remote control 43
- Switch setting Explanation 44
- Phone type, XLR type 45
- Types of plugs that can 45
- LouderQuieter 46
- PEAK indicator 46
- At this position 46
- Recording Karaoke 54
- Card Song and Recording It 59
- -48dB -6dB 62
- Track number Track number 64
- Adding Reverberation (Reverb) 73
- Sounding the Metronome 81
- Deleting Songs Individually 86
- Erasing All Tracks 87
- Song (Trim In) 88
- (Trim Out) 90
- Removing Finalization 94
- CD track number 95
- SD memory card track number 95
- Another CD Player (Finalize) 99
- (Backup) 100
- / Display 101
- (continued) 102
- Moving a Song 103
- Dividing a Track 104
- Joining Songs 106
- Remaining recording time 113
- (Spanish) 117
- (German) 117
- (French) 117
- (Italian) 117
- (Japanese) 117
- Condition (Factory Reset) 118
- Formatting an SD Memory Card 119
- Internal mic 122
- Connecting External Speakers 123
- OUT Jack 124
- Troubleshooting 125
- Problems with the Sound 126
- CD-Related Problems 128
- Messages 132
- Specifications 134
- For China 138
- For EU Countries 138
- Apparatus containing 139
- Lithium batteries 139
- Information 140
Résumé du contenu
Owner’s ManualCopyright © 2013 ROLAND CORPORATIONAll rights reserved. No part of this publication may be reproduced in any form without the written pe
10 USING THE UNIT SAFELY (continued) 101b Place in a well ventilated location The unit and the AC adaptor should be located so their location or pos
100 Creating a Duplicate of an Original Music CD (Backup) Here’s how to back up an original music CD you created, making an identical copy of your
Creating a Duplicate of an Original Music CD (Backup) (continued) 101Advanced UsesRecording Listening Deleting Creating a CD Editing an SD Appendice
102 Creating a Duplicate of an Original Music CD (Backup) (continued)The music CD’s tracks will be written as far as the free space on the SD memory
103Advanced UsesRecording Listening Deleting Creating a CD Editing an SD AppendicesConvenientFunctionsInformation/ DisplayChecking /Preparations Movi
104 Dividing a Track This operation divides a song into two songs. 1 Insert the SD memory card that you want to edit, and press the [SD CARD] button
Dividing a Track (continued) 105Advanced UsesRecording Listening Deleting Creating a CD Editing an SD AppendicesConvenientFunctionsInformation/ Disp
106 Joining Songs This operation join two songs, making them into a single song. The song will be joined with the following song. fig.SDedit-combine-
107Advanced UsesRecording Listening Deleting Creating a CD Editing an SD AppendicesConvenientFunctionsInformation/ DisplayChecking /Preparations Maxi
108 Creating a Copy of a Song in a New Key You can change the key of a song on an SD memory card (or CD ), and save the new version of the song on t
109Advanced UsesRecording Listening Deleting Creating a CD Editing an SD AppendicesConvenientFunctionsInformation/ DisplayChecking /Preparations Crea
USING THE UNIT SAFELY (continued)Advanced UsesRecording Listening Deleting Creating a CD Editing an SD AppendicesConvenientFunctionsInformation/ Dis
110 Creating a Copy of a Song at a New Playback Speed You can change the playback speed of a song on an SD memory card (or a CD ), and save the new v
111Advanced UsesRecording Listening Deleting Creating a CD Editing an SD AppendicesConvenientFunctionsInformation/ DisplayChecking /Preparations Crea
112 Viewing the Remaining Recording/Playback Time Here’s how to switch the time information shown in the screen. You can view the remaining time that
113Advanced UsesRecording Listening Deleting Creating a CD Editing an SD AppendicesConvenientFunctionsInformation/ DisplayChecking /Preparations View
114 Viewing Information about a CD-R/RW Disc Here’s how to view information such as the capacity of a CD-R/RW disc and the remaining time for recordi
115Advanced UsesRecording Listening Deleting Creating a CD Editing an SD AppendicesConvenientFunctionsInformation/ DisplayChecking /Preparations Adju
116 Automatically Dimming the Screen (Backlight Timer) If you’re operating the CD-2u/SD-2u on batteries (Page 24), you can set this function so that
117Advanced UsesRecording Listening Deleting Creating a CD Editing an SD AppendicesConvenientFunctionsInformation/ DisplayChecking /Preparations Chan
118 Returning the Menu Settings to their Factory-Set Condition (Factory Reset) This operation returns all settings you’ve made in the menus to their
119Advanced UsesRecording Listening Deleting Creating a CD Editing an SD AppendicesConvenientFunctionsInformation/ DisplayChecking /Preparations Form
12 IMPORTANT NOTES 301 ● Do not connect this unit to same electrical outlet that is being used by an electrical appliance that is controlled by an in
120 Adjusting the Left/Right Volume Balance of the Internal Mics When recording via the internal mics (Page 41), the recorded sound may not be even i
121Advanced UsesRecording Listening Deleting Creating a CD Editing an SD AppendicesConvenientFunctionsInformation/ DisplayChecking /Preparations Reve
122 Reversing the Stereo Field of the Internal Mics (continued) Here’s how to exchange the right and left channels of the internal mics. 1 Press the
123Advanced UsesRecording Listening Deleting Creating a CD Editing an SD AppendicesConvenientFunctionsInformation/ DisplayChecking /Preparations Conn
124 Connecting External Speakers (continued) You can choose the audio source that is output from the LINE OUT jack. 1 Press the [MENU] button to acc
125Advanced UsesRecording Listening Deleting Creating a CD Editing an SD AppendicesConvenientFunctionsInformation/ DisplayChecking /Preparations Trou
126 Troubleshooting (continued) Problems with the Sound ProblemCause and ActionSeePageNo sound ● Could the connections be incorrect? ➔ Make the corr
Troubleshooting (continued) 127Advanced UsesRecording Listening Deleting Creating a CD Editing an SD AppendicesConvenientFunctionsInformation/ Displ
128 Troubleshooting (continued) CD-Related Problems ProblemCause and ActionSeePageCan’t insert a CD ● Could you be using batteries?If you’re operati
Troubleshooting (continued) 129Advanced UsesRecording Listening Deleting Creating a CD Editing an SD AppendicesConvenientFunctionsInformation/ Displ
13 IMPORTANT NOTES (continued)Advanced UsesRecording Listening Deleting Creating a CD Editing an SD AppendicesConvenientFunctionsInformation/ Displa
130 Troubleshooting (continued) SD Memory Card-Related Problems ProblemCause and ActionSeePageThe SD memory card is not detected ● Could the SD memo
Troubleshooting (continued) 131Advanced UsesRecording Listening Deleting Creating a CD Editing an SD AppendicesConvenientFunctionsInformation/ Displ
132 Messages If a message is displayed, refer to the following list and take the appropriate action.Messages for which the upper line of the screen s
Messages (continued) 133Advanced UsesRecording Listening Deleting Creating a CD Editing an SD AppendicesConvenientFunctionsInformation/ DisplayCheck
134 Specifications * 0 dBu = 0.775 V rms* In the interest of product improvement, the specifications and/or appearance of this unit are subject to ch
135Advanced UsesRecording Listening Deleting Creating a CD Editing an SD AppendicesConvenientFunctionsInformation/ DisplayChecking /Preparations Inde
136 Index (continued) INT MIC Exchange ... 122Internal micsreversing the stereo field ...
Index (continued) 137Advanced UsesRecording Listening Deleting Creating a CD Editing an SD AppendicesConvenientFunctionsInformation/ DisplayChecking
For China For EU CountriesCD-2u_SD-2u_e.book 138 ページ 2013年1月24日 木曜日 午前11時34分
This product complies with the requirements of EMC Directive 2004/108/EC.For EU CountriesFor EU CountriesApparatus containing Lithium batteriesADVAR
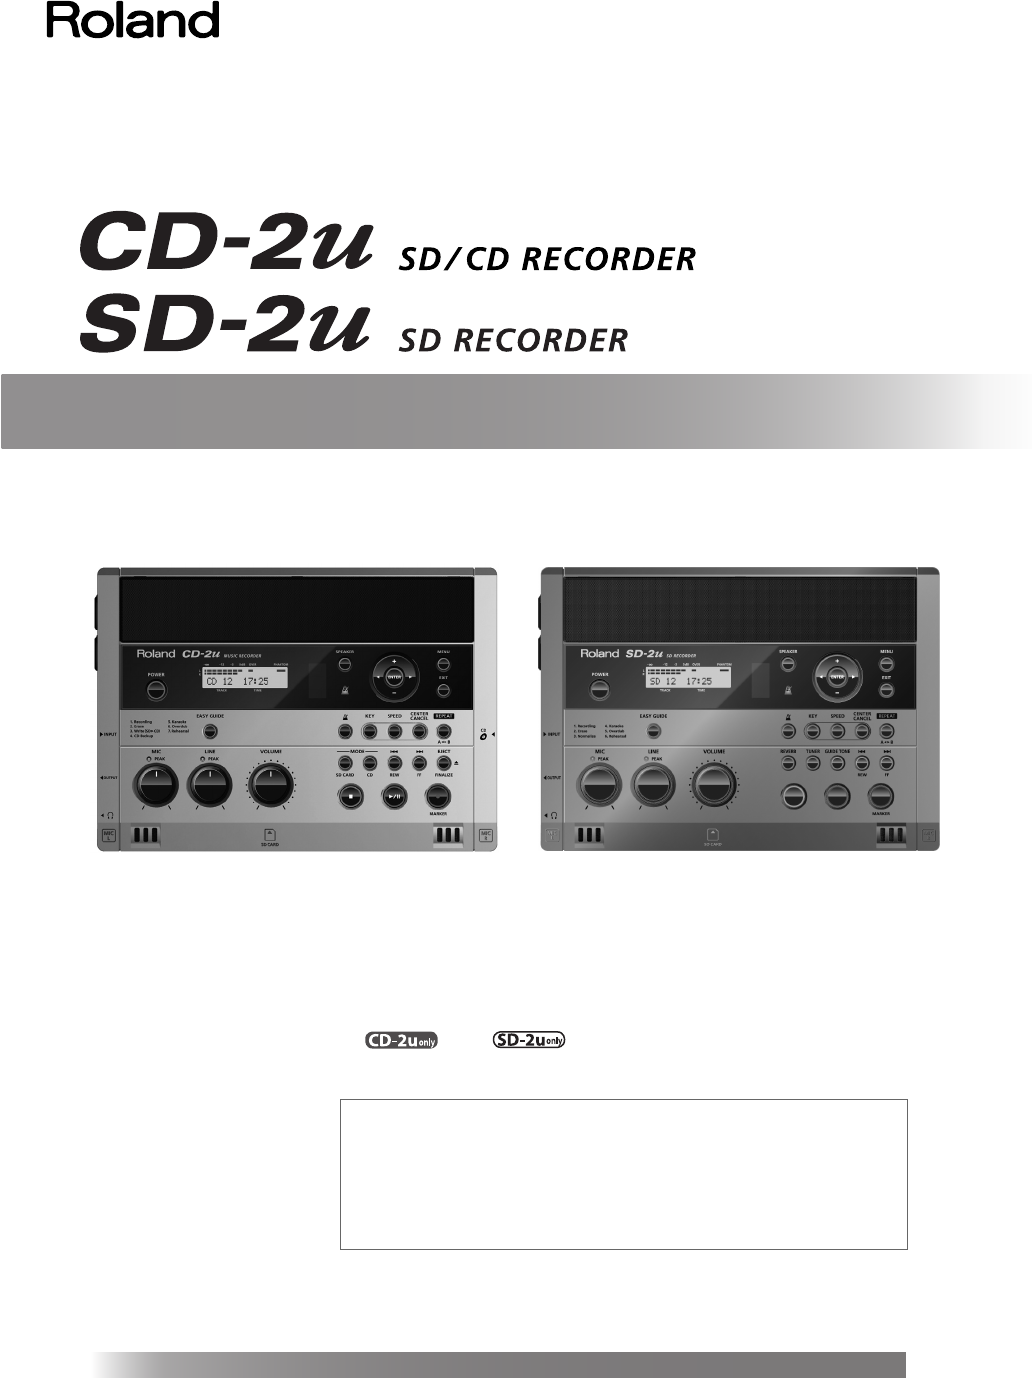
14 Panel Descriptions * The illustration depicts the CD-2u. MIC L/MIC R This is a stereo pair of mics built into the CD-2u/SD-2u. You can use these m
Information* 5 1 0 0 0 3 1 4 2 8 - 0 2 *CD-2u_SD-2u_e.book 140 ページ 2013年1月24日 木曜日 午前11時34分
Panel Descriptions (continued) 15Advanced UsesRecording Listening Deleting Creating a CD Editing an SD AppendicesConvenientFunctionsInformation/ Dis
16 Panel Descriptions (continued) The display shows information or messages related to the operation you’re performing, such as when you’re making v
Panel Descriptions (continued) 17Advanced UsesRecording Listening Deleting Creating a CD Editing an SD AppendicesConvenientFunctionsInformation/ Dis
18 Panel Descriptions (continued) fig.unit03.eps DC IN Connector Connect the dedicated AC adaptor (included) here. ☞ “Using the Dedicated AC Adaptor
Panel Descriptions (continued)Advanced UsesRecording Listening Deleting Creating a CD Editing an SD AppendicesConvenientFunctionsInformation/ Displa
IMPORTANT: THE WIRES IN THIS MAINS LEAD ARE COLOURED IN ACCORDANCE WITH THE FOLLOWING CODE.BLUE: BROWN: As the colours of the wires in the mains lead
20 Recordable Media and Functionality As its recording media, this device uses SD memory cards, and the CD-2u additionally allows you to use CD-R dis
Recordable Media and Functionality (continued) 21Advanced UsesRecording Listening Deleting Creating a CD Editing an SD AppendicesConvenientFunctions
22 Turning the Power On and Off You can operate the CD-2u/SD-2u either with the dedicated AC adaptor, six alkaline batteries (AA, LR6, sold separatel
Turning the Power On and Off (continued) 23Advanced UsesRecording Listening Deleting Creating a CD Editing an SD AppendicesConvenientFunctionsInform
24 Turning the Power On and Off (continued) * If operating this unit on batteries, please use alkaline batteries or rechargeable Ni-MH batteries. *
Turning the Power On and Off (continued) 25Advanced UsesRecording Listening Deleting Creating a CD Editing an SD AppendicesConvenientFunctionsInform
26 Preparing an SD Memory Card Here’s how to prepare an SD memory card for recording. * The CD-2u and the SD-2u support SDHC cards (up to 16 GB).* So
Preparing an SD Memory Card (continued) 27Advanced UsesRecording Listening Deleting Creating a CD Editing an SD AppendicesConvenientFunctionsInforma
28 Preparing an SD Memory Card (continued) 1 Turn the power off ( ☞ Page 23 , 25) . 2 Gently press the SD memory card inward, and then release y
29Advanced UsesRecording Listening Deleting Creating a CD Editing an SD AppendicesConvenientFunctionsInformation/ DisplayChecking /Preparations Prepa
Advanced UsesRecording Listening Deleting Creating a CD Editing an SD AppendicesConvenientFunctionsInformation/ DisplayChecking /Preparations Check th
30 Preparing a CD (continued) 1 Press the [EJECT( )] button. After the CD has been ejected, pull it all the way out. fig.CD04.epsfig.finalize-mssg01
31Advanced UsesRecording Listening Deleting Creating a CD Editing an SD AppendicesConvenientFunctionsInformation/ DisplayChecking /Preparations Prepa
32 Preparing the Remote Control (continued) Point the remote control toward the CD-2u/SD-2u’s sensor, and operate it within the specified operating
33Advanced UsesRecording Listening Deleting Creating a CD Editing an SD AppendicesConvenientFunctionsInformation/ DisplayChecking /Preparations Menu
34 Menu Operations (continued) * The default value (factory setting) is printed in bold characters.* The ✓ symbol in the “Battery” or “Playback” c
Menu Operations (continued) 35Advanced UsesRecording Listening Deleting Creating a CD Editing an SD AppendicesConvenientFunctionsInformation/ Displa
36 Menu Operations (continued) SYSTEM Auto Off (Enables/disables automatic power-off when no panel operation has been performed for a specified leng
37Advanced UsesRecording Listening Deleting Creating a CD Editing an SD AppendicesConvenientFunctionsInformation/ DisplayChecking /Preparations About
38 Setting Items in Easy Guide This section explains items that you can set in the screens appearing in Easy Guide.Record a vocal or instrumental per
Setting Items in Easy Guide (continued) 39Advanced UsesRecording Listening Deleting Creating a CD Editing an SD AppendicesConvenientFunctionsInforma
4 Table of Contents USING THE UNIT SAFELY... 8IMPORTANT NOTES...
40 Setting Items in Easy Guide (continued) While playing back a previously recorded performance from an SD memory card, you can layer (or overdub) a
41Advanced UsesRecording Listening Deleting Creating a CD Editing an SD AppendicesConvenientFunctionsInformation/ DisplayChecking /Preparations Recor
42 Recording Acoustic Instruments or Vocals (continued) 5 Select the internal mics. fig.menu-overdub-e.eps Press the [MENU] button to access the men
Recording Acoustic Instruments or Vocals (continued) 43Advanced UsesRecording Listening Deleting Creating a CD Editing an SD AppendicesConvenientFun
44 Recording Acoustic Instruments or Vocals (continued)Instead of adjusting the level by manually operating the [MIC] knob or [LINE] knob, you can u
Recording Acoustic Instruments or Vocals (continued) 45Advanced UsesRecording Listening Deleting Creating a CD Editing an SD AppendicesConvenientFun
46 Recording Acoustic Instruments or Vocals (continued) 5 Select the External mics. fig.menu-overdub-e.eps Press the [MENU] button to access the men
Recording Acoustic Instruments or Vocals (continued) 47Advanced UsesRecording Listening Deleting Creating a CD Editing an SD AppendicesConvenientFun
48 Recording Acoustic Instruments or Vocals (continued)You can set the sensitivity as appropriate for the external mic you’re using.1 Press the [MEN
Recording Acoustic Instruments or Vocals (continued) 49Advanced UsesRecording Listening Deleting Creating a CD Editing an SD AppendicesConvenientFun
5 Table of Contents (continued)Advanced UsesRecording Listening Deleting Creating a CD Editing an SD AppendicesConvenientFunctionsInformation/ Displ
50 Recording an Electronic Instrument Here’s how to connect an electronic instrument such as a digital piano or keyboard, and record your performance
Recording an Electronic Instrument (continued) 51Advanced UsesRecording Listening Deleting Creating a CD Editing an SD AppendicesConvenientFunctions
52 Recording a Cassette or Digital Audio Player Here’s how to record the sound from a cassette or Digital Audio Player. 4 Connect your audio device (
Recording a Cassette or Digital Audio Player (continued) 53Advanced UsesRecording Listening Deleting Creating a CD Editing an SD AppendicesConvenien
54 Recording Karaoke Here’s how the sound of the accompaniment and the sound of your voice being input via a mic can be recorded together to an SD me
Recording Karaoke (continued) 55Advanced UsesRecording Listening Deleting Creating a CD Editing an SD AppendicesConvenientFunctionsInformation/ Disp
56 Recording Karaoke (continued) 10 Press the [ ] (Play) button to begin recording. The song begins playing, and recording on the SD memory card beg
Recording Karaoke (continued) 57Advanced UsesRecording Listening Deleting Creating a CD Editing an SD AppendicesConvenientFunctionsInformation/ Disp
58 Recording Karaoke (continued) 10 Press the [ ] (Record) button to enter recording-standby mode. fig.rec-intmic04-e.eps 11 Press the [ ] (Play) bu
59Advanced UsesRecording Listening Deleting Creating a CD Editing an SD AppendicesConvenientFunctionsInformation/ DisplayChecking /Preparations Layer
6 List of Common Tasks Recording ● Automatically start new songs at silent spaces when recording from a cassette or MD ☞ Page 66 (Auto Marker) ● Aut
60 Layering Your Performance onto an SD Memory Card Song and Recording It (continued) 5 Adjust the playback level of the SD memory card and the inpu
Layering Your Performance onto an SD Memory Card Song and Recording It (continued) 61Advanced UsesRecording Listening Deleting Creating a CD Editing
62 Convenient Functions for Recording When the CD-2u/SD-2u is in recording-standby mode and it detects audio input that exceeds the specified level,
Convenient Functions for Recording (continued) 63Advanced UsesRecording Listening Deleting Creating a CD Editing an SD AppendicesConvenientFunctions
64 Convenient Functions for Recording (continued) During recording, you can assign a song number so that the subsequent material will be recorded as
Convenient Functions for Recording (continued) 65Advanced UsesRecording Listening Deleting Creating a CD Editing an SD AppendicesConvenientFunctions
66 Convenient Functions for Recording (continued) If a period of silence lasting longer than one second is detected during recording, recording will
Convenient Functions for Recording (continued) 67Advanced UsesRecording Listening Deleting Creating a CD Editing an SD AppendicesConvenientFunctions
68 Convenient Functions for Recording (continued) You can sound a count before recording begins. Hearing a count can help you practice the timing or
Convenient Functions for Recording (continued) 69Advanced UsesRecording Listening Deleting Creating a CD Editing an SD AppendicesConvenientFunctions
7 List of Common Tasks (continued)Advanced UsesRecording Listening Deleting Creating a CD Editing an SD AppendicesConvenientFunctionsInformation/ Di
70 Listening to a CD/Listening to an SD Memory Card * In order to play a CD, you’ll need to use the dedicated AC adaptor, which was included with the
Listening to a CD/Listening to an SD Memory Card (continued) 71Advanced UsesRecording Listening Deleting Creating a CD Editing an SD AppendicesConve
72 Convenient Functions for Playback Here’s how to adjust the tone of the playback sound to your taste. 1 Press the [MENU] button to access the menu
Convenient Functions for Playback (continued) 73Advanced UsesRecording Listening Deleting Creating a CD Editing an SD AppendicesConvenientFunctionsI
74 Convenient Functions for Playback (continued) If you don’t want sound to come from the speakers, press the [SPEAKER] button to turn them off. The
75Advanced UsesRecording Listening Deleting Creating a CD Editing an SD AppendicesConvenientFunctionsInformation/ DisplayChecking /Preparations Chang
76 Making Fine Adjustments to the Playback Pitch (Pitch) This adjusts the pitch of the playback sound in one-cent steps. One cent is 1/100th of a sem
77Advanced UsesRecording Listening Deleting Creating a CD Editing an SD AppendicesConvenientFunctionsInformation/ DisplayChecking /Preparations Slowi
78 Enjoying Simple Karaoke (Center Cancel) This function cancels the portion of the sound that is heard in the center of its stereo image, such as th
79Advanced UsesRecording Listening Deleting Creating a CD Editing an SD AppendicesConvenientFunctionsInformation/ DisplayChecking /Preparations Repea
8 USING THE UNIT SAFELY 001-60 To completely turn off power to the unit, pull out the plug from the outlet Even with the power switch turned off, thi
80 Repeatedly playing a portion of the song (A/B Repeat) You can have a specified section play back repeatedly.Repeatedly listening to a section of a
81Advanced UsesRecording Listening Deleting Creating a CD Editing an SD AppendicesConvenientFunctionsInformation/ DisplayChecking /Preparations Sound
82 Sounding the Metronome (continued) 4 Specifying which beats are emphasized. fig.menu-metro05-e.eps Use the [ ] [ ] buttons to choose “Beat.”Use t
83Advanced UsesRecording Listening Deleting Creating a CD Editing an SD AppendicesConvenientFunctionsInformation/ DisplayChecking /Preparations Tunin
84 Tuning Your Instrument (Tuner Function) (continued) 5 Tune the instrument so that the left and right tuning guides are both displayed. When your
Tuning Your Instrument (Tuner Function) (continued) 85Advanced UsesRecording Listening Deleting Creating a CD Editing an SD AppendicesConvenientFunc
86 Deleting Songs from an SD Memory Card Here’s how to delete a single, selected song.When you delete a song, subsequent songs will be moved forward,
Deleting Songs from an SD Memory Card (continued) 87Advanced UsesRecording Listening Deleting Creating a CD Editing an SD AppendicesConvenientFuncti
88 Deleting Songs from an SD Memory Card (continued) If you start recording slightly ahead of the beginning of the performance so as to avoid missin
Deleting Songs from an SD Memory Card (continued) 89Advanced UsesRecording Listening Deleting Creating a CD Editing an SD AppendicesConvenientFuncti
USING THE UNIT SAFELY (continued) 9Advanced UsesRecording Listening Deleting Creating a CD Editing an SD AppendicesConvenientFunctionsInformation/ D
90 Deleting Songs from an SD Memory Card (continued) If you stop recording slightly after the end of the performance so as to avoid missing anything
Deleting Songs from an SD Memory Card (continued) 91Advanced UsesRecording Listening Deleting Creating a CD Editing an SD AppendicesConvenientFuncti
92 Erasing Tracks from a CD-RW Disc Here’s how to erase the last track recorded on a CD-RW disc. * In order to perform this operation, you’ll need th
Erasing Tracks from a CD-RW Disc (continued) 93Advanced UsesRecording Listening Deleting Creating a CD Editing an SD AppendicesConvenientFunctionsIn
94 Erasing Tracks from a CD-RW Disc (continued) You can remove finalization from a CD-RW disc (Page 99) so that the disc can once again be used for
95Advanced UsesRecording Listening Deleting Creating a CD Editing an SD AppendicesConvenientFunctionsInformation/ DisplayChecking /Preparations Selec
96 Selecting Songs from an SD Memory Card to Create a CD (continued) 7 If you’re sure you want to proceed, press the [ENTER] button. (Note that the
Selecting Songs from an SD Memory Card to Create a CD (continued) 97Advanced UsesRecording Listening Deleting Creating a CD Editing an SD Appendices
98 Selecting Songs from an SD Memory Card to Create a CD (continued)“WAV 16-bit” and “44.1 kHz” is supportedIf you want to create a music CD using s
99Advanced UsesRecording Listening Deleting Creating a CD Editing an SD AppendicesConvenientFunctionsInformation/ DisplayChecking /Preparations Makin
Plus de documents pour Matériel d'enregistrement Roland CD-2u


Produits connexes et manuels pour Matériel d'enregistrement Roland CD-2u

 (16 pages)
© 2020, manymanuals.fr. Tous droits réservés | 0.556 s |
 Manymanuals.com
 Manymanuals.de
 Manymanuals.fr
 Manymanuals.it
 Manymanuals.pl
 Manymanuals.cz
 Manymanuals.es
 Manymanuals-pt.com
Commentaires sur ces manuels